InDesign data merge
The problem: You have been asked to prepare company business cards for all 130 employees working at ACME Multicorp. One side in Japanese and the other in English. No small task indeed.
Your initial plan may be to create a template file and then use that as a master to create a new file for each employee. Time consuming, but it will get the job done. You will end up with 130 files though (or 260 if you make a new one for both front and back) and a nightmare of a scenario if the boss suddenly says he wants to change the font/color/logo at the last minute…
Fear not. By using the powerful data merge features of InDesign you can set up just one template file and have InDesign read the employee information from an external spreadsheet. Updates to either design or content are then a breeze.
Here’s how we can do it.
Create a spreadsheet
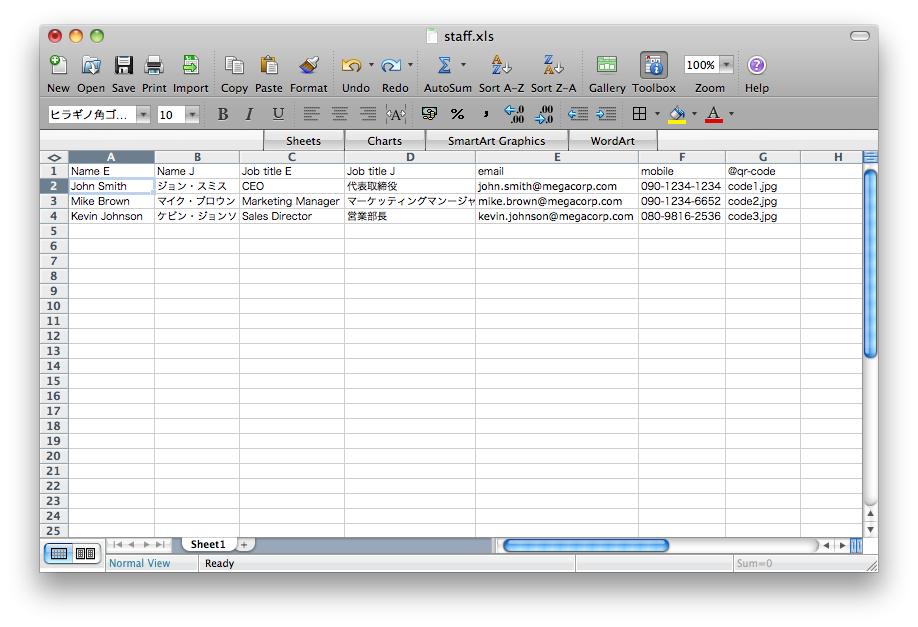
First you will need a data source. That is, all the names and email addresses and job titles etc. of all the employees. You can even include images if you like. Perhaps a mugshot of each employee or a QR-code for example. We set all that up in our spreadsheet. For the sake of this example we will use Microsoft Excel.

Decide on the fields you will need on your business card. We’ll have First Name, Last Name, Job Title, Email, Portrait. In the first row of your spreadsheet we use these fields as our column headers. Then we go through and write the actual values for each employee on a new row.
Working with images
The only tricky part is including images. We don’t paste the actual image into our spreadsheet, merely include the path to them on our local drive. This way InDesign will read the path and pull in the image directly. This gives the added benefit that we can edit the image whenever we like and along as the path remains the same, the most up-to-date file will always appear in InDesign.
The trick is to first define which column in our spreadsheet is our image field by adding an @ symbol before the column name. E.g. @portrait. Excel isn’t happy about you typing those kinds of symbols into a cell however and will complain with an error. To get around it we must escape the character using an apostrophe. So, we type ‘ in front of the @ sign and Excel will then behave.
To avoid image path issues, I recommend saving the data file, the images and the InDesign template file all in the same folder. Your path in the spreadsheet will then need only be something like filename.jpg, without the need for slashes, folder names and volumes etc. but you can just as easily write ‘images/filename.jpg’ if you want to put the images in their own folder.
Export the spreadsheet data
The last step in setting up the data file is to export the Excel file to a format InDesign can read. A tab delimited text file works best. Simply select file > save as… and in the drop down list of file formats select ‘Tab delimited text file’. Name the file as you wish, in our example we’ll name it as staff.txt.
NOTE: If using Japanese or other non-latin characters export using the UTF-16 text file format.
Import the data into InDesign
Now we get to play with InDesign. Create a new 2 page document, business card size (91 x 55mm for Japanese standard size cards) and include the 3mm bleed in the options like good little designers.
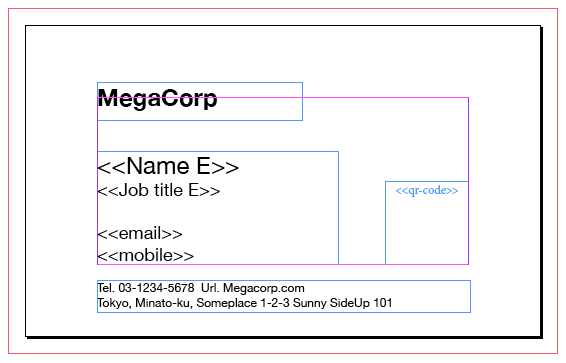
Design your business card just as you normally would, formatting the type and arranging the logo and colors etc. to your heart’s desire.
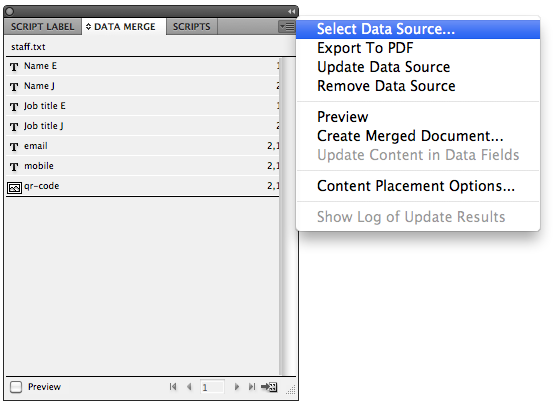
Next, navigate to Window > Utilities > Data Merge and in the little palette that pops up, click on Select Data Source… in the contextual panel menu. Browse for the data file you created earlier and load it as the data source.

Set up placeholders
You will now see a list of all the column headers in your spreadsheet. Now we set up placeholder text using the fields in the list. To do this, we simply select some text in our design that want swapped out and then click on the field we want to appear there from the list. The text will get swapped out with a placeholder like this <

Set up the data merge and watch the magic
From the palette contextual menu, select Content Placement Options… and for Image Placement check the Center in Frame and Link Images boxes and for Fitting, select Fit Images proportionally. The other boxes can be left unchecked.
Click on Preview in the Data Merge palette and check that the data is being read in as you expected. If it all looks good, click on Create Merged Document. What this will do is save a new version of your InDesign file for you with as many pages as necessary to generate all the business cards.
Click the radio button to ensure All Records in your data file will be used and then OK. InDesign will do its thing and a new file will appear in a new tab.
Export to PDF
Scroll through the file and if everything looks good, you can either generate a light, low resolution PDF to send to the client for approval or select a press-ready PDF format and create a file with all the bleed and marks as required by your printer.
Now when the client comes back and says they would prefer the text in red and 2 point larger, you only have to edit the one template file and generate the data merge document again since all the placeholders have been created and the data source linked. Or, if they decide they need 5 more employees or something is spelled incorrectly etc., you need just edit and save the Excel data file, update the data source (contextual menu > Update Data Source) and re-export again.

